Slicer school
You've come to Slicer School. Here you don't talk about "possibilities" - you take it and do it.
Want your videos to work for you, not you for someone else? Then listen up.
We'll teach you how to spin social media so that your content goes to people, gathers views, and for every one of those interests, your pocket is spun.
It doesn't matter whether you have experience or not - the main thing is to keep your hands moving and your brain switched on. Go through the lessons, do what you're told, and earn money in the process. It's simple: you do it, you get it.
In this system, tomorrow is always more expensive than yesterday. And those who think too long always catch up.
Grade 1
Class 1 of 5: How the system works
Now let's find out what this movement is, what kind of videos are made here and why you can earn from the first days - without experience, without "connections" and other nonsense.
One lesson. Just 15-20 minutes and you have a complete picture in your head of how everything works.
Next, let's go step-by-step: what formats go in, how much they pay, and what rules you need to follow to make sure your hard work converts into ticket growth.
Remember: your ticket is worth more tomorrow than yesterday. The key is to act.
Lesson #1.
It's simple: if you want to make money, you take your camera, your head, your hands and make it. You can make a meme, a motivational video, a cut with me or anyone else - as long as the conditions are met.
What does that mean?
- The banner should be there, and it should be visible at all times, not somewhere out there flickering for a second.
- The format is vertical.
- No rubbish, no nonsense, no other people's adverts.
- A video needs to hold attention. A person should watch it to the end, not scroll through it after three seconds.
How to do :
- Found it interesting - at least in the news, at least in an old interview, at least in bloggers.
- You come up with a pitch - sharp, funny, clever. The main thing is to hook you.
- Opened an editor (CapCut or whatever), inserted the banner, designed it.
- Pour it in. That's it.
How much can you get :
It's simple: the more views, the more tickets. Today, a ticket costs this much, tomorrow it will cost more. So your work is valued not only now, but also in the future.
- 50,000 hits? You get one amount.
- A million? Many times that.
You decide where your ceiling is.
Conclusion :
It's not a game or a contest. It's a job that grows with the system. Each video is a contribution to your own future. It will bring you more tomorrow than it does today.
Class 1 results
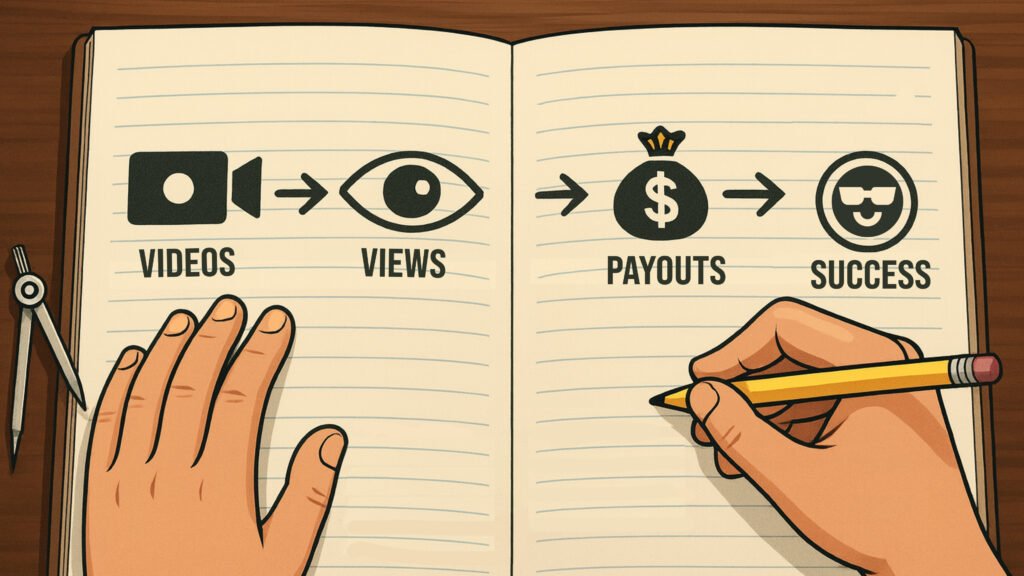
Now you understand how the system works: you take a video and upload it, you get tickets for views. Not for likes, not for subscribers, but for people's attention. Even if you have zero subscribers, nobody cares. The main thing is reach. The bigger it is, the more you earn.
What you've learnt:
- The system is simple: make a video, post it on TikTok, Shorts, Reels - and get tickets for views.
- No restrictions on genre: meme, slicing, motivation, analytics - anything goes, as long as there's a banner and the conditions are met.
- Payouts are fixed and clear in advance: you look at the table and know how much you will get for your coverage.
- Editing is not an obstacle. We will explain and show you everything so that even someone who was afraid of the mouse before will be able to make a video.
Next, you'll start practising. In the second class you learn what to mount in and how to work quickly.
Grade 2
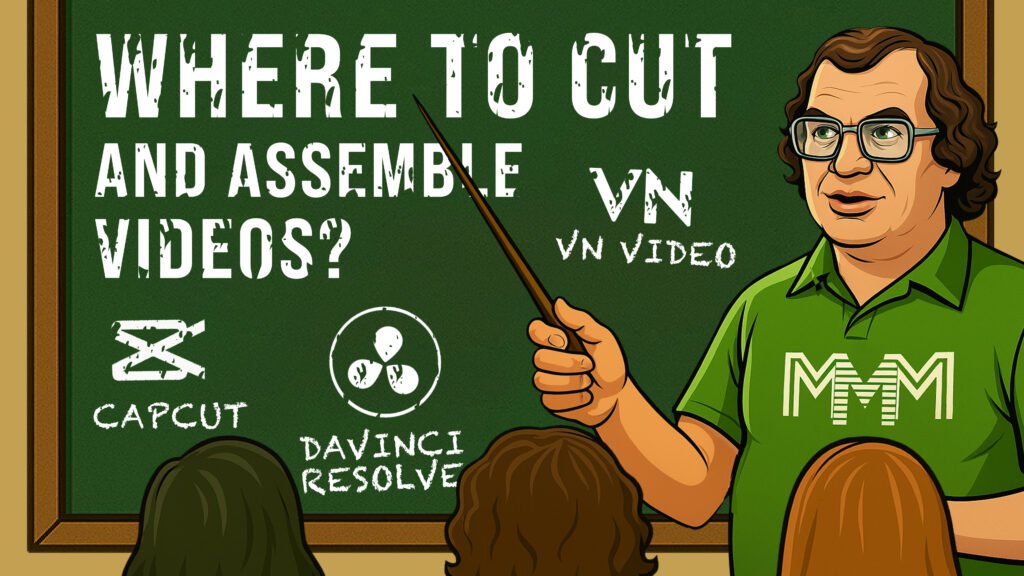
Grade 2 of 5 : Where to cut and assemble rollers?
Editing is not scary and it doesn't take long. It's not an art for the chosen few, but an ordinary household job: a couple of minutes and the video is ready.
In this class, I'll show you where and how to make a video quickly, even if you've never edited anything in your life.
Let's take a look at the simplest and most convenient programmes for both phone and computer. No unnecessary theory, only what really works.
Three short lessons - 10-15 minutes of your time, and you already know what to use.
And how exactly to mount it - we'll get into that later, in fourth grade.
Go ahead. Familiarise yourself with the instruments.
Lesson 1 - Montage on the phone
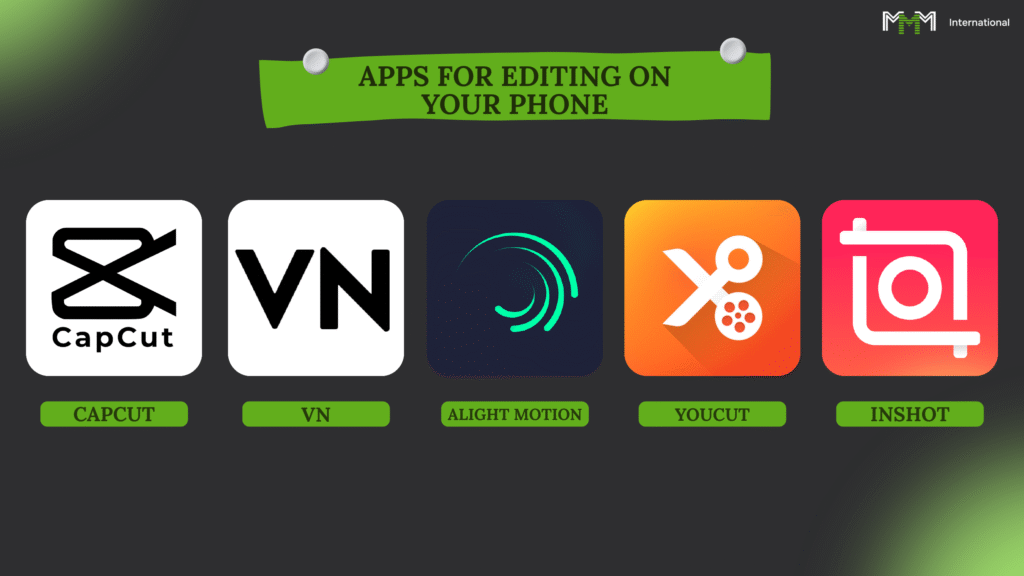
No computer? You don't need one. Nowadays, a phone is your editing studio in your pocket.
Cut, speed up, insert music, subtitles, effects - all done in a couple of taps.
There are a lot of programmes. All of them are the same in essence - they differ only in appearance and a couple of extra buttons. Choose what you are comfortable with.
Here's what I recommend:
- CapCut - the easiest and most popular. There's everything from slicing to templates.
- VN Video - A little more complicated, but it will be suitable for those who have at least once held an editing machine in their hands.
- InShot - quick, simple, uncluttered.
- Alight Motion - for fans of effects and animations, but you'll have to work a little harder.
- YouCut - minimalism and speed. Ideal for short clips
Phone in hand, you're a director. Everything else is an excuse.
Lesson 2 - Montage on the computer
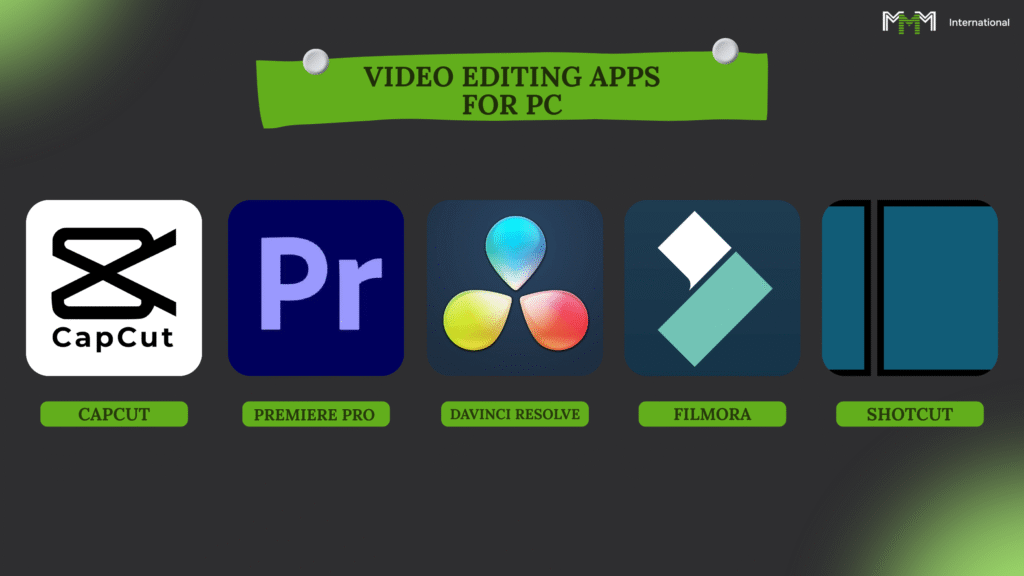
Do you want to edit like a grown-up - with a big screen and fast controls? The computer is your tool.
The main thing here is not to bury yourself in hundreds of buttons, but to choose a software in which your hands will work and not get confused.
Here's what you can take to the launch:
- CapCut for PC - free, easy, everything you need. Cut, add text, music, effects. Windows and Mac.
- DaVinci Resolve - power like Hollywood. It's free, but you'll have to figure it out.
- Adobe Premiere Pro is the favourite toy of professionals. Paid, but without restrictions.
- Shotcut - minimum of unnecessary stuff, just basic editing.
- Filmora - easy, fast, loads of effects. But the free version has a watermark.
Remember: a programme is just a tool. It is not the software that makes miracles, but the person sitting behind the screen.
Lesson #3 - Choose a tool and go into battle
You can edit on a typewriter - it's just a matter of being comfortable and understandable.
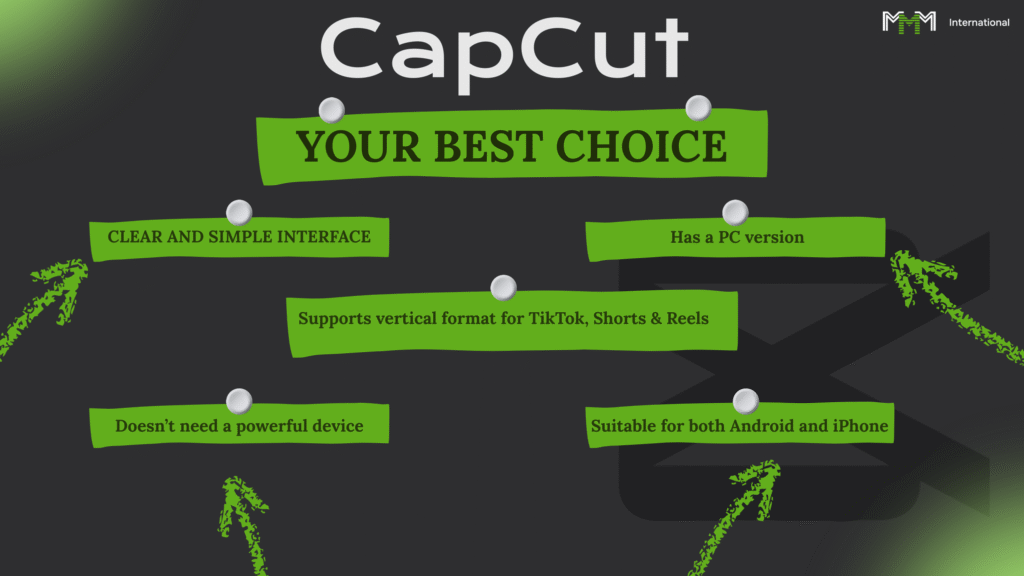
But if you're a beginner and don't want to drown in buttons, go for CapCut. It is available on both your phone and computer and works without any tambourine dances.
CapCut is free, simple, and already has everything you need:
- Cut, paste, add subtitles, effects, music.
- Works on Android and iPhone
- There is a PC version
- Doesn't require space iron
- Makes vertical videos under TikTok, Shorts, Reels - no dancing or perversions
Want something else? Please: VN Video, InShot, Adobe Premiere Rush, Movavi, DaVinci Resolve (if you are ready to dig in).
But let me repeat: CapCut covers all tasks to start with. From there, you will find out what you need.
Download links:
Google Play -. poke here
The AppStore is. poke here
Grade 2 results
Well, now you are no longer wandering in the dark - you know where and on what you can edit videos for MMM, even from your phone or computer. Even if before the maximum you could edit was bread in a sandwich.
What we've cleared up:
- The phone's not an obstacle. You have CapCut, VN, InShot and you're on your way.
- PCs are even easier: CapCut, Shotcut, Filmora. If you want to get fancy, go to DaVinci or Premiere. Go to DaVinci or Premiere, but you need a computer, not a calculator.
- CapCut is the golden mean: it works everywhere, it's not dumb, everything is intuitive.
- Even with old hardware, you can make decent videos. It's not the device, it's your hands.
- The format is mandatory: a 9:16 vertical.
The conclusion is simple: you've already chosen the tool, now it's time to move on to the next step - and get neural networks on board.
Grade 3
Grade 3 of 5 : Working with neural networks

Listen carefully. Neural networks are your free slaves who don't sleep, don't eat, and don't ask for a salary. One writes the script, one reads the text, one draws the picture, one animates. Your job is just to pull it all together into one film and send it to the web. That's it.
What we'll sort out:
- How to formulate prompts so that the neural network produces results rather than rubbish
- How to put together a video in half an hour that looks like it was done by a production team for money
- How to generate scenarios on any topic
- How to draw the right picture without photoshop
- How to bring any picture to life and turn it into a video
- How to give voice to text, even if you sound like a tired neighbourhood radio announcer
Trust me, there's no magic involved. There are clear tools and simple steps. I'll show you, you can do it again.
Lesson 1 - Getting to know ChatGPT
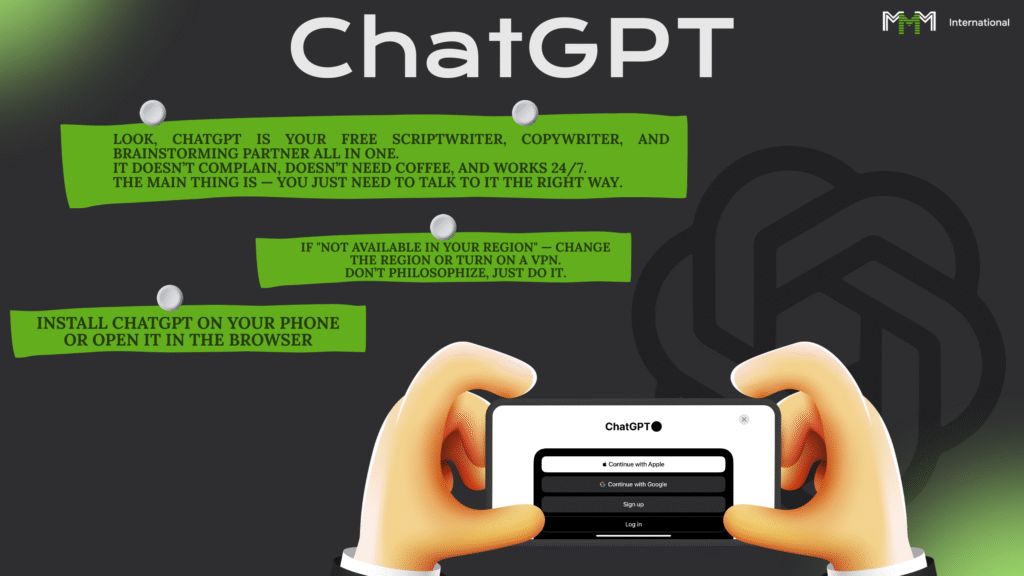
See, ChatGPT is your free screenwriter, copywriter and brainstormer all in one. It doesn't whine, it doesn't demand coffee, and it works around the clock. The key is to have the right conversations with it.
What we're doing:
- Put ChatGPT on your phone or open it in a browser
- iPhone: here
- Android: here
- Through the browser: here - If "doesn't work in your region" - change region or switch to VPN. Don't philosophise, just do it.
- ChatGPT Versions:
- GPT-3.5 - for simple questions and quick ideas
- GPT-4 is for normal scripts, serious texts and teaching
- GPT-4.5 (paid) - for maximum quality and complex tasks. Here the content will already be like that of expensive productions
Why would you want him:
- Writing scripts for your videos
- Comes up with ideas when you're being stupid
- Makes descriptions and texts for social networks
- It searches for anything faster than you can Google it.
- Helps generate requests for voiceovers
And how exactly do you squeeze out a script that hooks the viewer? That's in the next lesson. There we'll look at what and how to write to him so that he doesn't talk rubbish.
Lesson #2 - How to properly pull the right strings on a neural network
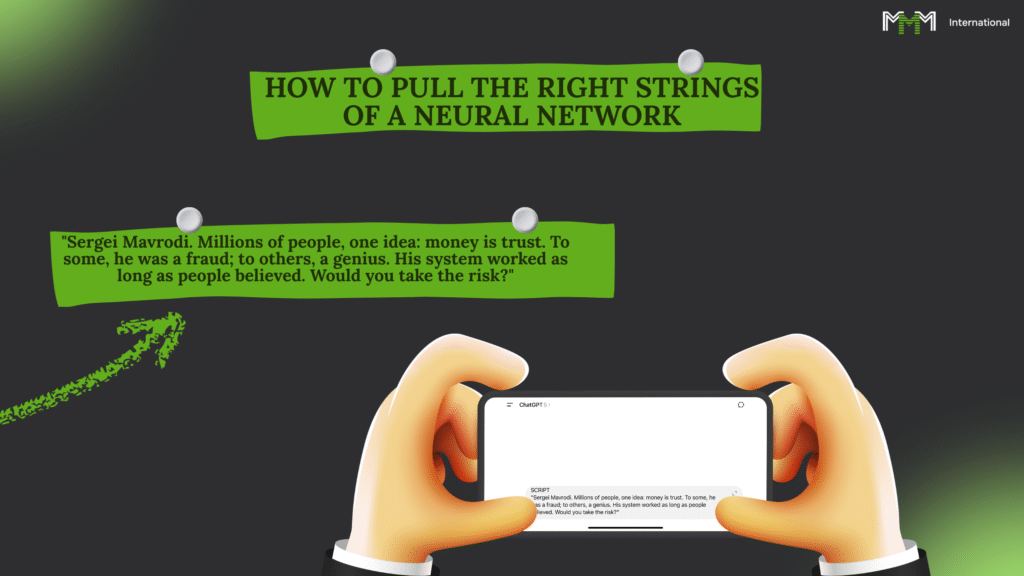
Listen to me carefully.
The whole secret to working with a neural network is that it's not telepathic.
You write what you write, you get what you get. You write rubbish, you get rubbish.
Formulate a request (prompt)
Prompt is your order. If you want a good result, be specific. Describe everything: style, duration, mood, details.
Bad Prompt:
"Make a video about MMM" - so what? About the cat with the tickets? About the dollar rate?
Good Prompt:
"Write a short, funny script for 30 seconds about the rise of the MMM ticket rate, with a slight irony and a couple of tenacious phrases" - and you'll already have a normal material.
If the result is dismal, don't be silent, use the neural network:
- "Make it funnier."
- "Add more wicked irony."
- "Replace the middle of the roller."
- "I want to be faster and more energetic."
Scenario generation
When you learn how to give orders correctly, the neural network will give you turnkey scenarios. Specify what format you need - short, tough, motivating, absurd.
Example:
"Write a witty script for a 30-second TikTok about how people wish they had joined MMM yesterday, because tickets are more expensive today."
Next, see the result, edit, season, taste.
If you learn to control this "machine", the rolls will be stamped faster than the ticket rate grows.
In the next lesson, I'll show you how to generate an image to make your video look like thousands of dollars were paid for it.
Lesson #3 - How to squeeze a picture out of Leonardo AI
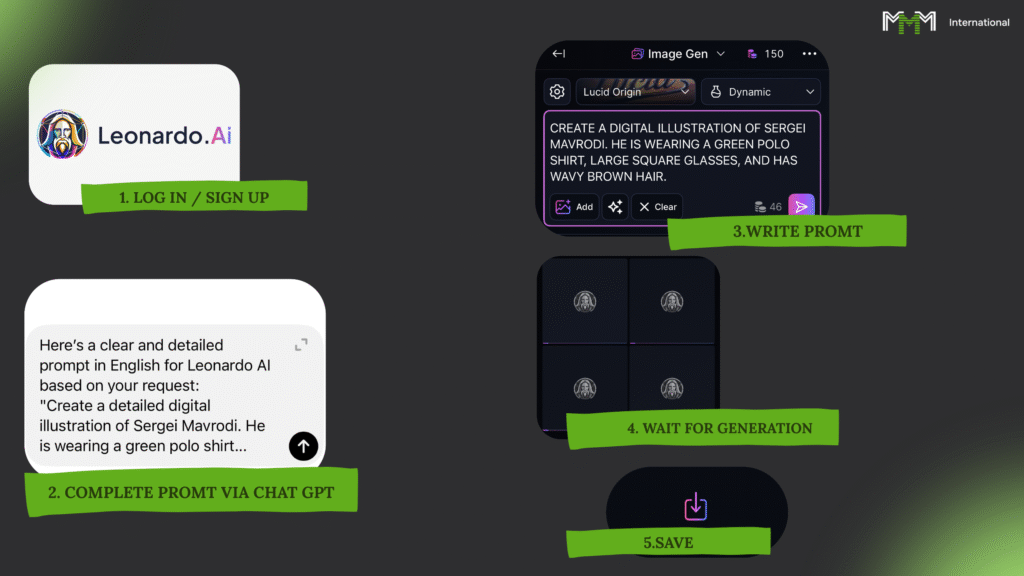
Leonardo is such an obedient robot artist. He'll draw you anything. But, like any artist, it works only as well as you clearly explain to it what you need.
And yes, it's free. 150 coins per day free of charge. It takes about 10 coins per picture. So, 15 pictures a day you can do without spending a penny at all.
STEP 1. REGISTRATION
You go to the website leonardo.aiYou register (it takes a minute). After logging in, you will immediately see a field where you can write your "order" (prompt).
STEP 2. LANGUAGE
Write only in English. He doesn't understand Russian - at best he will give out some nonsense, at worst nothing.
STEP 3. DRAFT AN ORDER (PROMPT)
You don't know English? No big deal. You type this command into ChatGPT:
"Compose a clear and detailed prompt for Leonardo AI in English. I want a picture: ..." - and then you describe whatever you want to see.
For example: "Sergei Mavrodi, a charismatic man in a dark, elegant suit, standing on a stage under dramatic lighting. Behind him, glowing holographic financial graphics rise upwards, symbolising growth and movement. His face is expressive, with sharp features, his glasses reflecting the light of the charts. The atmosphere is tense, cinematic, futuristic, with golden accents and a touch of mystery."
ChatGPT will translate and package your request nicely. You just copy it to Leonardo.
STEP 4. GENERATION
You put in the text, click Generate. The system deducts coins, thinks, and in half a minute you have a picture ready.
You don't like it? Then you didn't explain it well. You go back to ChatGPT, clarify: add a background, change the colour, make it comic book style, add a "financial drama" atmosphere. - and you try again.
STEP 5. SAVE
When you are satisfied, you download the picture. Then you can animate it, add movement - we will study this in the next lesson.
Lesson #4 - How to animate a picture in Runway
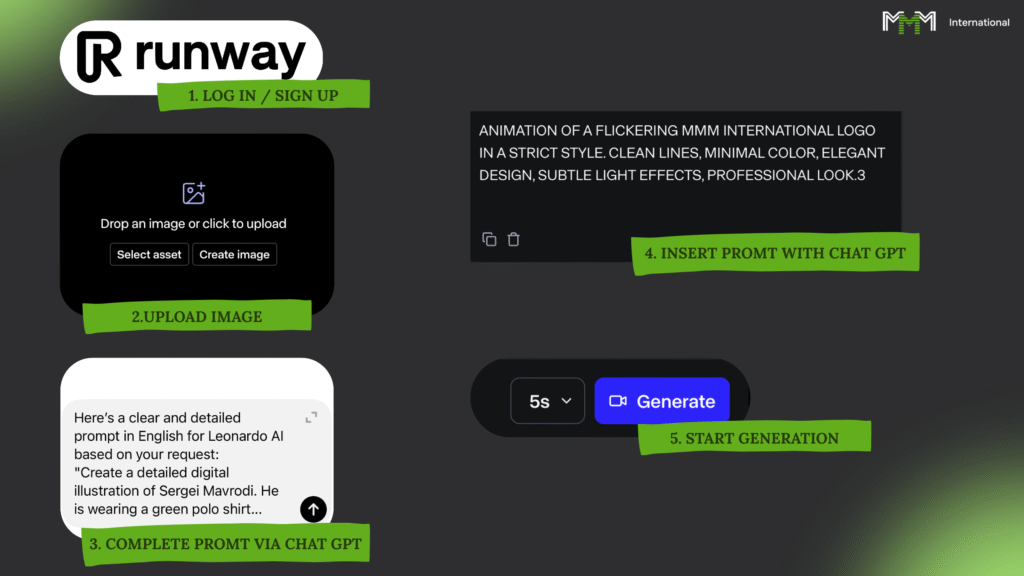
Runway is a digital animation factory. You take a picture and in a couple of minutes it is already moving, flashing, living its own life.
Bonus right away: when you sign up. 125 credits. One short video (5 seconds) costs about 25 credits. That is, roughly speaking, you have enough for five attempts for free at the start.
STEP 1 - REGISTRATION
You're going to app.runwayml.comyou create an account. After logging in, you will immediately be taken to the video creation screen.
STEP 2 - UPLOAD PICTURE
You click on the plus sign and upload the same image you made before in Leonardo AI (or anywhere else).
STEP 3 - PROMPT
Writing is strictly in English. If your English is in a coma, don't be a hero - write in ChatGPT:
"Make a clear and detailed prompt for Runway, so that the character moves. In the image: Sergei Mavrodi, a charismatic man in a dark, elegant suit, stands on a stage under dramatic lighting. Behind him, holographic financial graphs shine, pointing upwards, symbolising growth. His face is expressive, his glasses reflecting the light of the charts. The atmosphere is cinematic, tense, with golden accents and a touch of mystery. At the end of the scene there is a flash, as if to symbolise the explosion of change."
ChatGPT will give you the text, you just copy it into Runway.
STEP 4 - GENERATION
You paste that text into the box, you click Generate - and you wait. In a couple of minutes you have a video ready.
STEP 5 - FINALISATION
Didn't like it? Go back to ChatGPT and check it out:
- "More movement."
- "The explosion is more powerful."
- "Make it sharper and faster."
GPT will rewrite the prompt, you try again. It's simple.
But how to add a voice and make your character also speak - that's in the next lesson.
Lesson #5 - How to make text speak with Eleven Labs
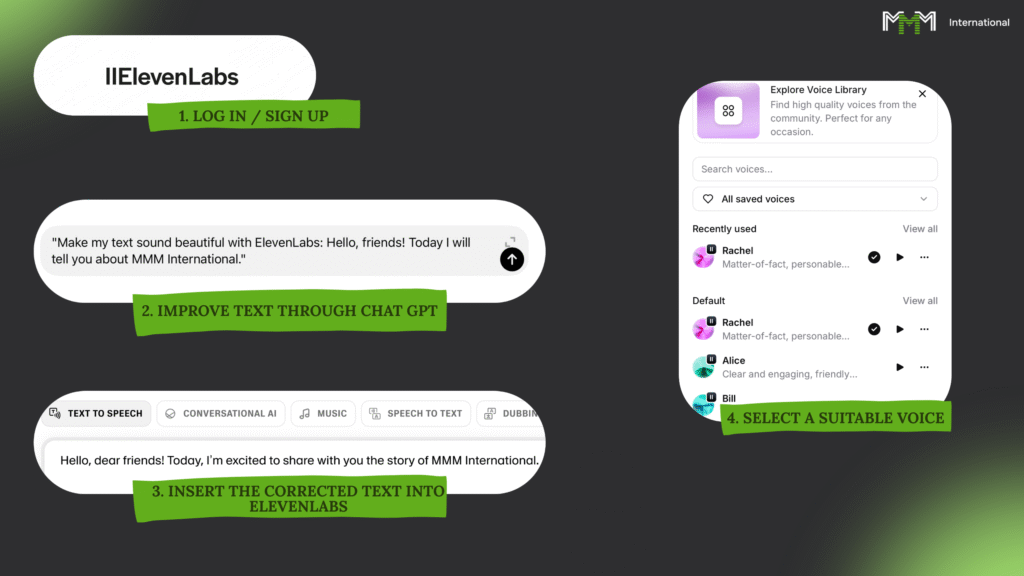
Eleven Labs is not just a voiceover. It is when your text begins to live, breathe and sound as if it were spoken by a real person. It also understands the Russian language, and it does so in a surprisingly natural way.
STEP 1 - REGISTRATION
You go to elevenlabs.io and you create an account. Mail or Google - no difference.
STEP 2 - TEXT
You write what you want the video to say.
Example:
Hi friends, today I'm going to tell you about a system that allows anyone to make money even if their pocket is empty.
STEP 3 - VOICEOVER
You take a ready text, paste it into Eleven Labs in the field for voicing.
STEP 4 - VOICE SELECTION
You pick the voice you like and press start. That's it. In a couple of seconds you have a live voiceover ready.
Tip:
Don't like the way it sounded? Change the wording in ChatGPT, try again. Sometimes one word can completely change the perception.
With this pairing - GPT and Eleven Labs - your videos will stop being just videos. They'll start to sound.
Grade 3 results
Now you're not just holding a phone or a computer. You have a whole staff of invisible workers - and not one of them asks for a salary. These neural networks write for you, draw for you, voice and even animate the picture. And you are the main person who manages it all.
What you and I figured out:
- ChatGPT is your scriptwriter, editor and idea generator in one person. If you say exactly what you need, you get what you need.
- Prompt is the key. If the request is inaccurate, you'll get rubbish. A precise request - you get a masterpiece.
- Leonardo AI is your personal artist. But you have to speak to him in English and be very clear.
- Runway will animate any picture, even if you've never animated anything in your life.
- Eleven Labs will dub your text so that you can't tell the difference from a live person.
- Everything together can be put together into a full length video in half an hour sitting on the couch.
Conclusion:
Now you know how to create all content from A to Z. Text, sound, picture, video - everything is under your control. All that's left is to put these pieces together into a complete video. That's what we're going to do in the next class.
Grade 4
Grade 4 of 5 : How to edit video

Now we're going to do the most important thing - assembly. You already have everything: text, sound, picture, pieces of video. The only thing left to do is to put them together into a complete product, so that the viewer watches to the end and you get paid for it.
What's going to happen:
- Let's take CapCut apart - simple, fast, no fuss.
- I'll show you how to cut and paste, change the sound, speed up, slow down, add captions and effects.
It's not just "editing." It's your own personal content production pipeline. From here, videos will come out that can bring you thousands of views - and therefore, payment.
9 lessons, less than an hour of time, and you already know how to put together a video ready to pour.
Let's get your money factory up and running.
Lesson 1 - Creating a project
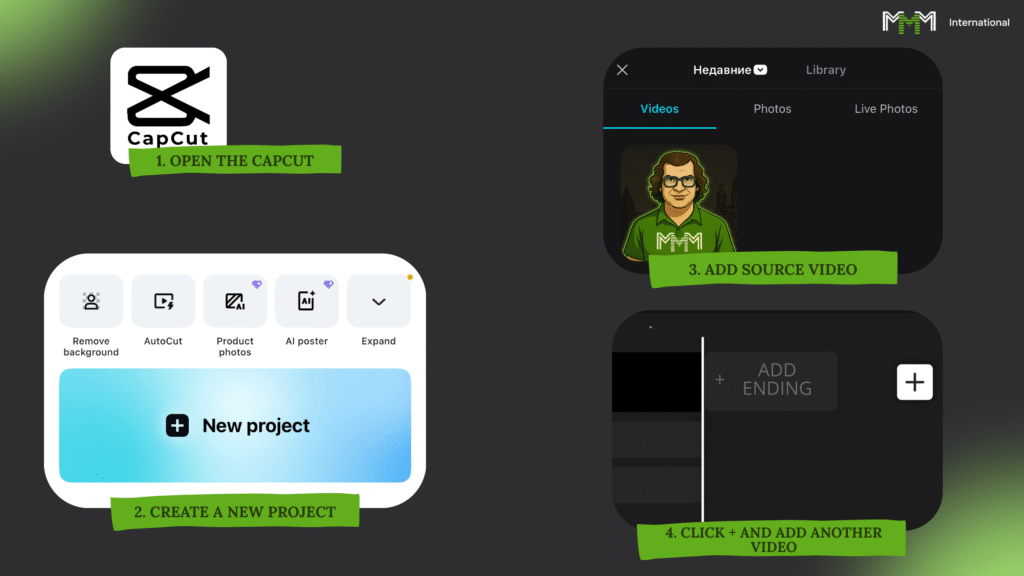
We will work in the mobile version of CapCut.
If you use something else, no problem. The logic is the same. The only difference is where to press.
On a computer there's a mouse instead of a finger, but the essence is the same: there's a source, there's an editor, and you put them together into a finished video.
Hint: look at the pictures - you won't get lost with them.
STEP 1: Create a project
If your programme immediately asks for project settings, put it in:
- Resolution: 1080×1920 (Full HD, vertical)
- FPS: 30 frames per second
For those in CapCut:
- Open CapCut
- At the bottom, select the left tab
- Click "New Project."
Then you will be offered to choose what to work with. You can choose one clip, or several. At the start, take one, click "add". That's it - you have the source, with which we will work further.
STEP 2. Do you want another source?
- Click the white plus sign at the bottom right
- Pick the file you want, click "add".
Now the project is ready, sources are loaded. Let's move on to the most interesting part - controlling the editor.
Lesson #2 is. CapCut interface - working area
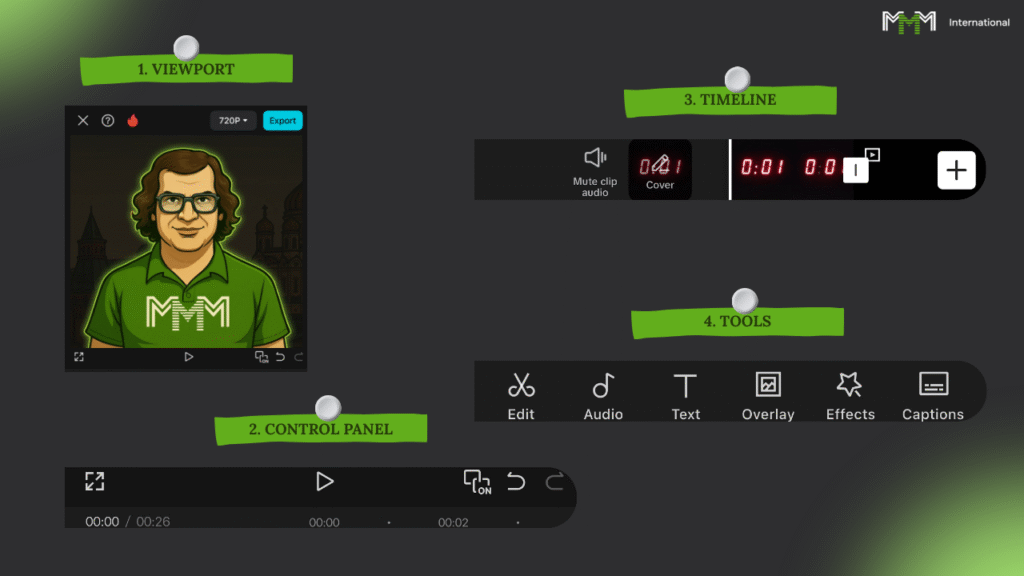
Look carefully. In front of you is your future printing press. Here you will collect videos that can bring you more than one thousand dollars.
Let's break down what's responsible for what :
1. TOP - VUPPORT.
It's a screen where you can see what you're getting, and what shot is now worth editing on.
2. Underneath is the CONTROL PANEL (left to right):
- Expand video to full screen
- Play / Stop
- Key Personnel
- Cancel the last action
- Rescind
If you have expanded to full screen - the exit is at the bottom right.
3. below - TIMELINE
This is the heart of the editing suite. It's where all your videos, sounds, and texts are. It's where you cut, move, and glue the video together.
- Speaker icon on the left - instantly mutes all videos
- The white vertical stick (playhead) in the centre - shows what is now visible in the viewport
4. THE LOWEST PART - TOOLBAR
The tools change depending on what you've selected on the timeline. Video is one function. Sound is different. Deselected - common buttons.
We'll tell you about each trick as we go along - you won't remember it all at once anyway.
You got it? Oh, good. Then we can move on.
Lesson #3 - Working with timeline
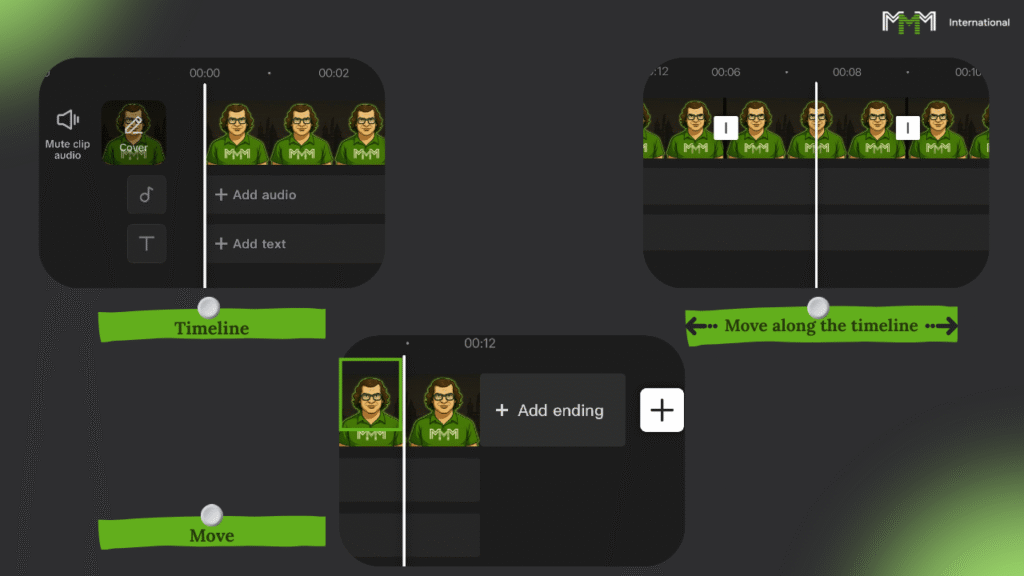
Timeline is your surgeon's workbench. It's where you cut, glue and rebuild content, turning raw material into a finished product. Once you're done with it, you've got a pass to the world of normal editing.
The timeline has all your sources laid out on tracks :
- Audio - all the music, the sounds, the voice.
- Overlaps - everything on top of the main video: extra clips, animations, graphics.
- Text - all captions, subtitles, headlines.
To fix something, you go to the desired track, select an element and work with it.
Now for the basic techniques:
1. Zooming in/out of the timeline
You need it to hit the shots more accurately.
- Bring your fingers closer together.
- Divide it - distanced it.
2. Moving through the timeline
To quickly find the moment:
- Touching the screen on the timeline.
- You swipe left and right.
- The video is moving and the frames are changing in the viewport.
3. Moving the rollers
Basic stuff:
- You pull back the timeline.
- You clip the clip you want.
- When it becomes a rectangle, you drag it where you want it to go.
Yes, in the beginning you'll be poking like a keyhole in the dark. But after 10 minutes, your hand will start to move. And that's when you'll have a pipeline of viral content.
Lesson #4 - Working with a selected source
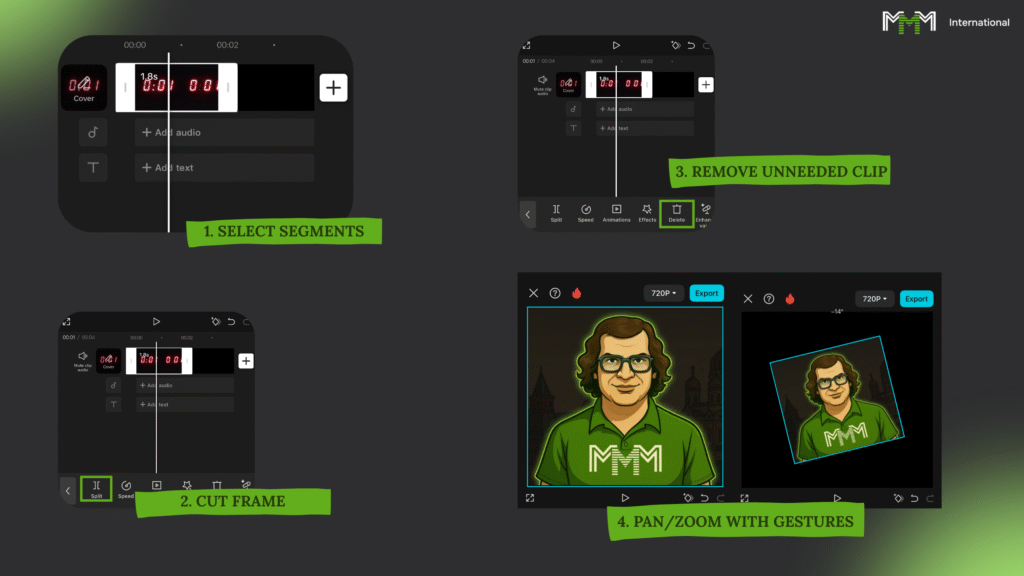
Part 1. Editing
You want to trim a clip? Highlight it first.
- Tap once - bold edges and a white border will appear.
- The toolbar at the bottom will change - you now control that particular piece.
There are two ways:
1. Pull the edge
- You grab the side frame.
- Pull it to the centre - cut off the excess.
- Pull from the centre, you get back what you cut off.
2. Section
- You put a white playhead stick where you want to chop.
- Hit "Cut."
- You highlight the piece you don't want.
- Hit "Delete."
That's it, clean and snot-free.
Part 2. Scaling
Need to zoom in or zoom out? Make sure that the clip is highlighted and there is a thin blue frame around the viewport - that means you are working with it.
- Two fingers on the screen.
- Spread it, enlarge it.
- Shifted - reduced.
You want to turn, you move your fingers to one side.
If you want to shift the frame, you drag the video around the viewport with one finger.
This trick saves you when you need to align the composition nicely or remove unnecessary rubbish from the frame.
To deselect, click on an empty space on the timeline or select another clip.
Get used to it - it'll get even easier from here, and you'll start cutting videos on automatic.
Lesson #5 - Add banners
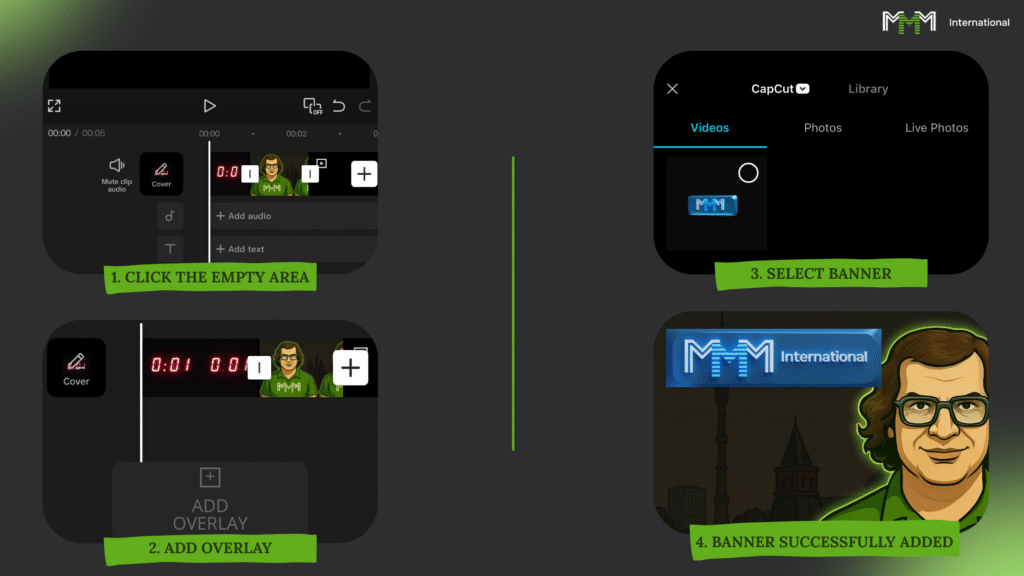
A banner is your signature stamp on your video. The viewer should immediately realise whose video it is.
STEP 1. Prepare the banner
- Download the banner gif
- Deselect all clips (click on the empty space in the timeline).
STEP 2. Glue the banner into the video
- At the bottom, you press "Overlays" → "Add Overlay".
- You go to the section "Photo." (that's where the gifs go).
- You find the downloaded banner and add it.
What you get:
- Banner at the top of the viewer's window.
- Separate banner track below the video on the timeline.
How it works in CapCut:
Imagine the white playhead stick is a laser that hits from the bottom up.
The first thing he touches is and will be seen on top of everything.
In other montages it can be the other way round, but here it's bottom to top.
STEP 3. Working with the banner
You can do everything with it that you can do with video:
- Cutting.
- Timeline drag.
- Magnify.
- Change to another right in the middle of the roll.
Important:
- The gif can simply be stretched to the end of the video.
- One banner at a time.
- Place it so that it doesn't overlap important elements.
- Banners are located in the advertising cabinet in the section "Advertising materials".
We're done with that. In the next lesson, we will deal with the text.
Lesson #6 - Add text
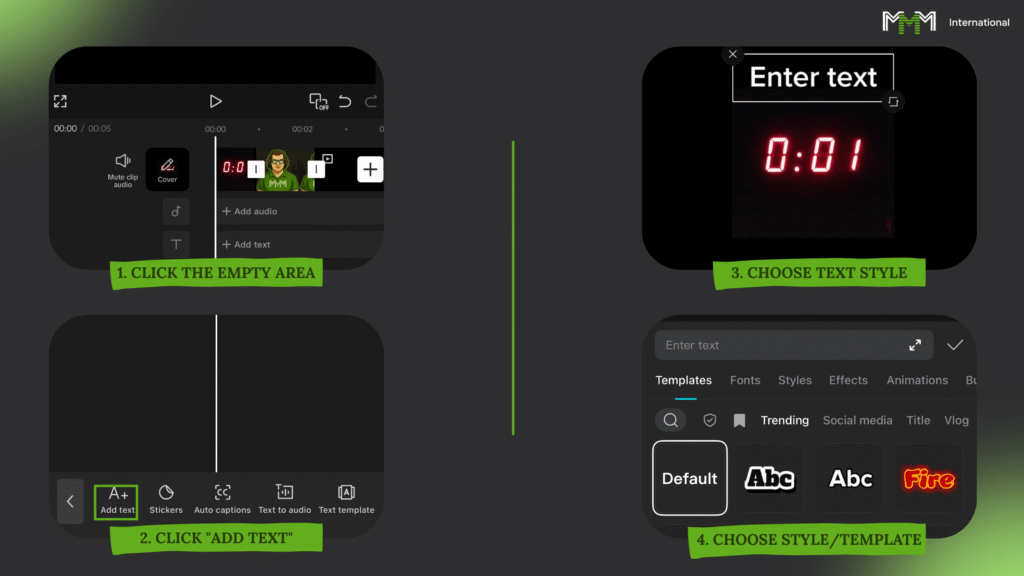
The text in the video is your voice, even if you are silent. It should be prominent, but not interfere with the video.
STEP 1: How to insert text
- First deselect all clips (click on an empty space on the timeline).
- At the bottom of the panel, you click { "text". → "Add Text.".
- You write whatever you want. It's simple.
You want to hide the keyboard so you can see the picture, the button to the right of the input field.
STEP 2: Customise the text
Once entered, you have a whole armoury open to you:
- Templates - ready-made design options.
- Fonts - choose a letter style.
- Styles - colour, stroke, background, glow.
- Effects - ready-made presets that make text more prominent.
- Animations - The text can be "jumped out", "dissolved", "shaken", etc.
- Bubbles - comic-book format, where the text is as if someone is speaking it.
- Presets - you save your style and use it again.
Don't be lazy, play around with the settings to see what works for you. When you're all set, click the tick on the right.
STEP 3: Place text
In the viewport, you can twist, zoom in, zoom out and move the text - just like you did with the banner.
Important:
- Text always lies above everything else - videos and banners.
- It should be readable and stay out of blind spots (where social media puts buttons and captions).
- Don't clutter the whole screen with captions - overdoing it kills interest.
The text is ready. The screen is talking. We move on to the next technique.
Lesson #7 - Add sound
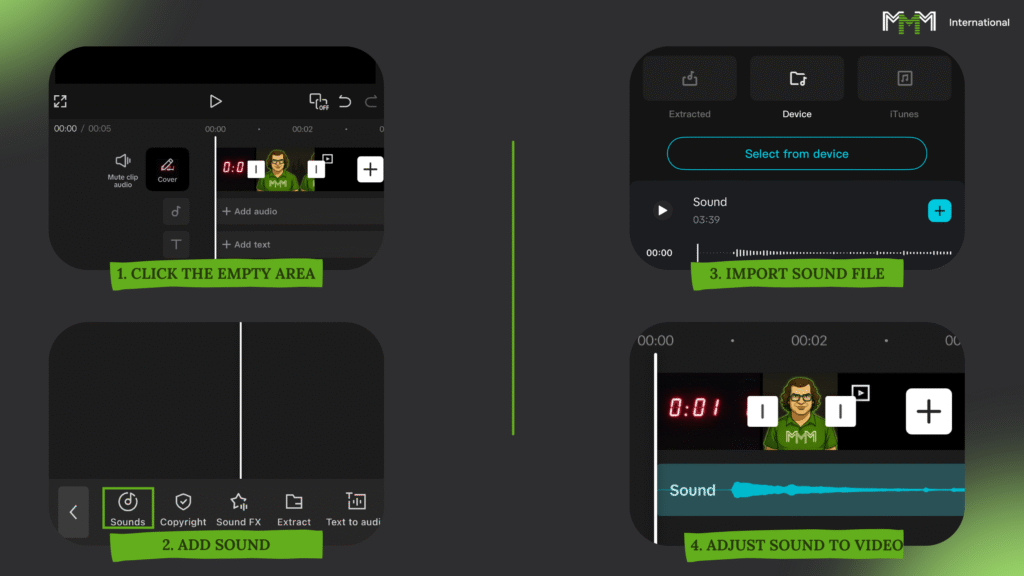
Sound is half of success. Even a silly video with the right voiceover can go viral.
STEP 1. Open the audio track
- Deselect all clips (click on an empty space on the timeline).
- Or click on the soundtrack to enter it.
STEP 2. Upload Audio
There are two ways:
- Underneath the source code, click "Add sound.".
- Either downstairs - "Sound" → "Import.".
You choose what to put in:
- Video from the gallery - we just take the sound without the picture.
- Audio file (.mp3, .wav) - your finished voiceover or music.
In our case, we take the file with the voiceover and upload it.
STEP 3. Working with audio
- Crop it, move it, combine it with scenes.
- Make sure the voice or music goes with the pace of the video.
Tip:
If you feel that the video is empty, go back to the neural network, add more pictures or short videos and insert them under the audio.That's it. Now you have not just a picture, but a video that "speaks".
Next comes the final touch: exporting.
Lesson #8 - Useful CapCut features
You're no longer afraid of editing, which means it's time to speed things up and add more expression to your videos. These tools will help you work faster and make your content sharper.
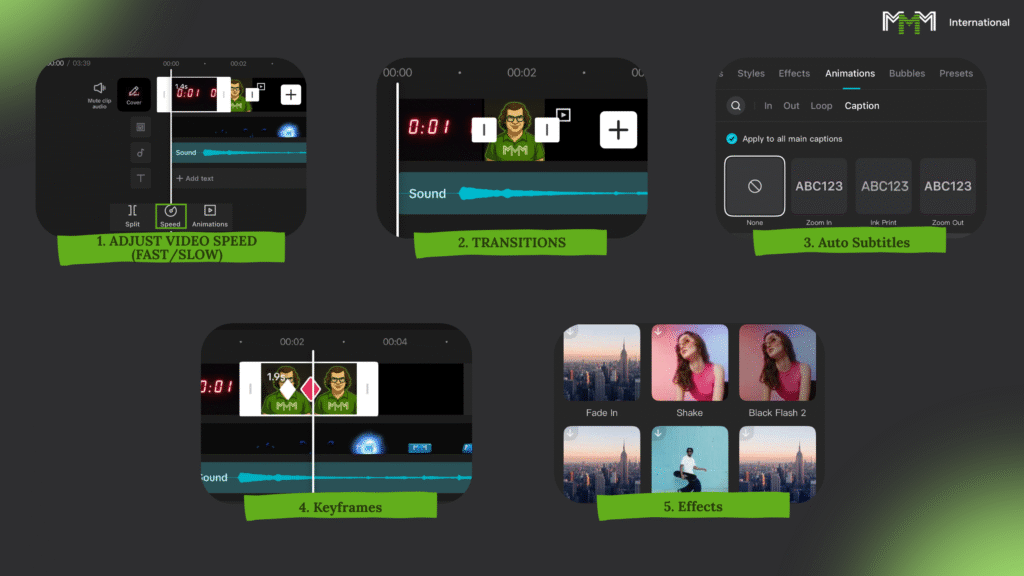
1. Acceleration / deceleration
Highlight a clip → select "Speed" at the bottom. You can speed up, slow down or make dynamics within the fragment.
2. Key personnel
Allow you to animate scale, position, and tilt.
Scheme: put a key → rewind → change parameter → put a second key. That's it, you have a smooth movement.
3. Transitions
A white square will appear between the clips - click and select the effect. It works only if the clip is not selected.
4. effects
Overlay on top of the whole clip. Deselect → select "Effects" → apply what you want.
5. Autosubtitles
CapCut will recognise speech and insert the text itself.
Open the "Subtitle" menu → set font and language → click "Apply".
6. Templates
Take a ready-made montage from other authors. On the start screen, tab "Templates" → "Use" → insert your own videos.
7. Ratio of parties
To convert from horizontal to vertical: "Aspect Ratio" → 9:16 → adjust the scale.
Remember: all this is an add-on to the base. Without the base, effects and tricks will not help you, but with the base they will make the video more powerful.
Lesson #9 - Exporting the finished video
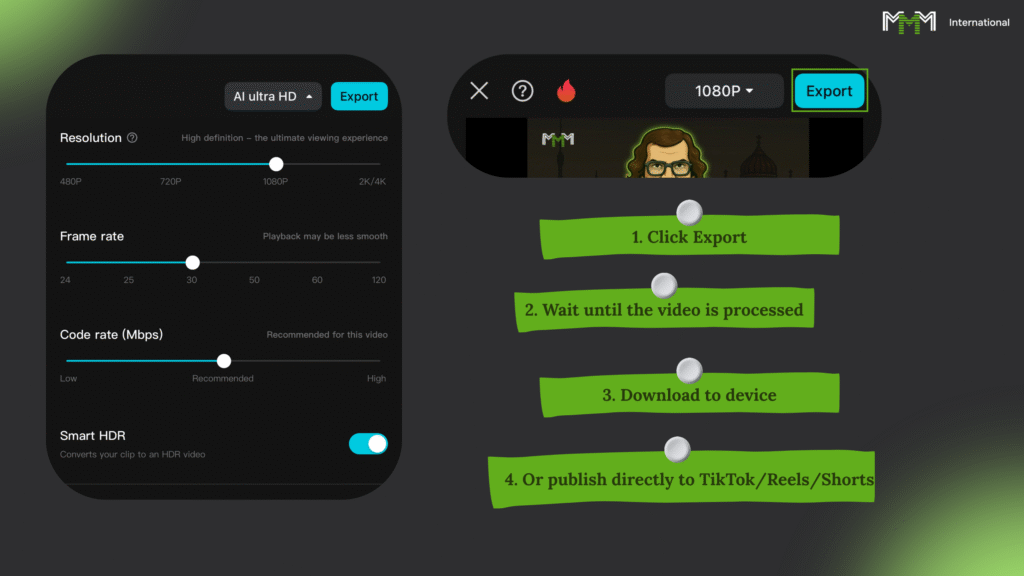
Here we go. Picture, sound, banners, text - everything is assembled. Now we just need to take the last step.
1. Click on "Export" - button in the upper right corner.
2. You wait a few secondswhile CapCut chews up the project.
3. Save - the clip ends up on your phone or computer.
4. Either you put it out right away TikTok, Shorts, Reels, wherever you're aiming.
That's it. From a piece of raw material, you've made a finished product that can already bring you views... and money.
Grade 4 results
Okay, you and I are past the editing basics.
If you've made it to this point - then you've had the patience and brains to realise the main thing.
If it looks like something else is floating around, no problem. It always is. With a little more practice, you can make videos with millions of views as easily as making tea.
What we did in this class:
- The CapCut interface has been sorted out
- Learned how to add anything: video, sound, text, banners
- Mastered basic editing techniques
- Captured useful chips that save time and effort. Good for you. Now you are no longer a "dummy" in editing.
The skills are there, the tools are there - it's time to move on and turn that into money.
Grade 5
Class 5 of 5 : Warming up the account
Creating an account and immediately flooding it with videos is like going outside and yelling through a megaphone, "Look, I'm here!"
Algorithms don't like such abrupt newbies - and will gladly relegate your videos to the basement, where no one will see them.
In this class, we'll break it down:
- How to make a clean account that will live a long time
- How to behave in the first few days so that algorithms accept you as a normal user and not a spammer
- What is "warm-up" and why your rollers will be dead without it
- How to work with both the Russian segment and the West at once, in order to squeeze out maximum views. We have four lessons, 10-20 minutes of time.
Do everything according to the instructions - your account will live and bring views for months, not burn out in a couple of days.
Lesson 1 - Preparing the device and IP
Before you rush to create an account, you need to make sure that social networks do not consider you another spammer. If a dozen pages have already been stamped from your phone, the algorithms see this and will gladly write you off as a "shadow".
What to do:
- Get another device
- Or reset your phone to factory settings (don't forget to save everything you need beforehand)
If you work for a Russian-speaking audience:
Switch on VPN and choose a region - Ukraine, Belarus or Kazakhstan. This will clear your digital footprint and reduce the risk of blocking.
If you're aiming for the foreign segment :
In VPN, specify USA, India, Netherlands, Germany, Spain, Brazil, Argentina.
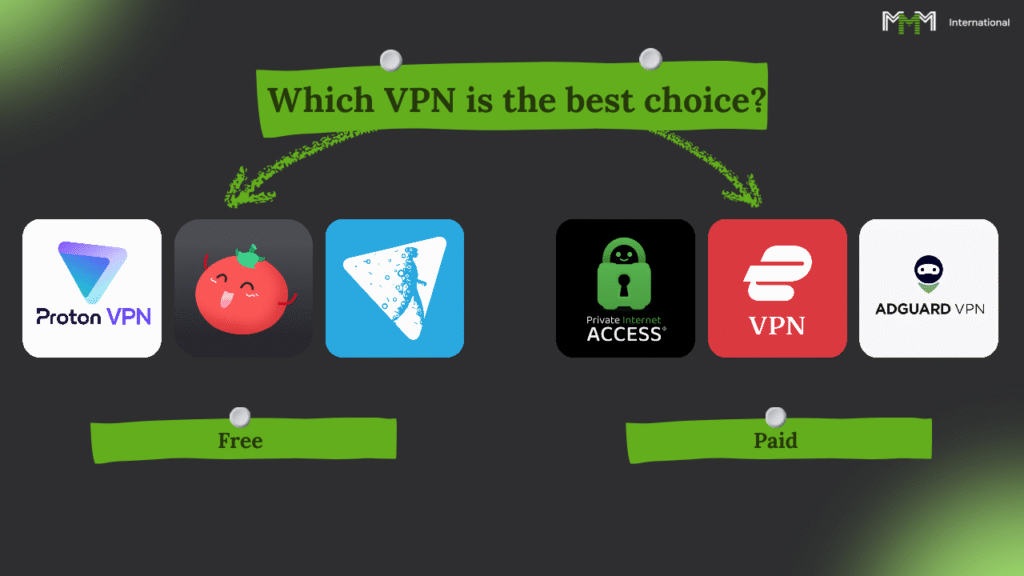
Reliable VPNs :
Freebies
- ProtonVPN - reference
- Windscribe - reference
Paid
- Surfshark - reference
- NordVPN - reference
The rule is ironclad: one account - one IP. Always log in with the same region from which you created the page.
Lesson 2 - Creating a mail and account
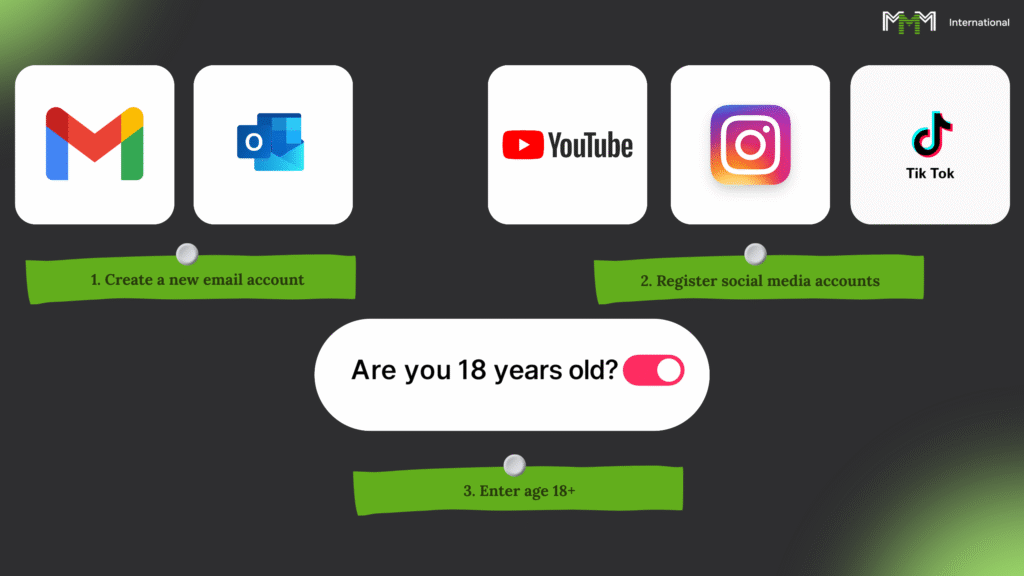
Let's start with a simple one. If you want to avoid being strangled at the start - forget about old emails, old pages and other rubbish from the past. It's a clean slate.
- You make a new post office
Don't have these "emails" and other junk. Gmail click here or Outlook. here. These guys are the least annoying of the algorithms. - You create a page on the desired social networking site
TikTok, Instagram, YouTube - choose where you want to earn money. But register everything at once for the purpose you are pursuing. - Age 18+.
Even if your passport says different. They don't like small people here, they cut the scope and limit them to the full.
And once again: the whole process is only with the VPN enabled. One wrong move and the system has already marked you. It's like chess, you can't turn back a move.
Lesson #3 - First steps in the account - how not to get banned on the spot
Look, when you create a new account, the main thing is not to start waving your arms around, attracting the attention of security guards. Algorithms are like thieves in the law: they see everything, remember everything, and don't give second chances.
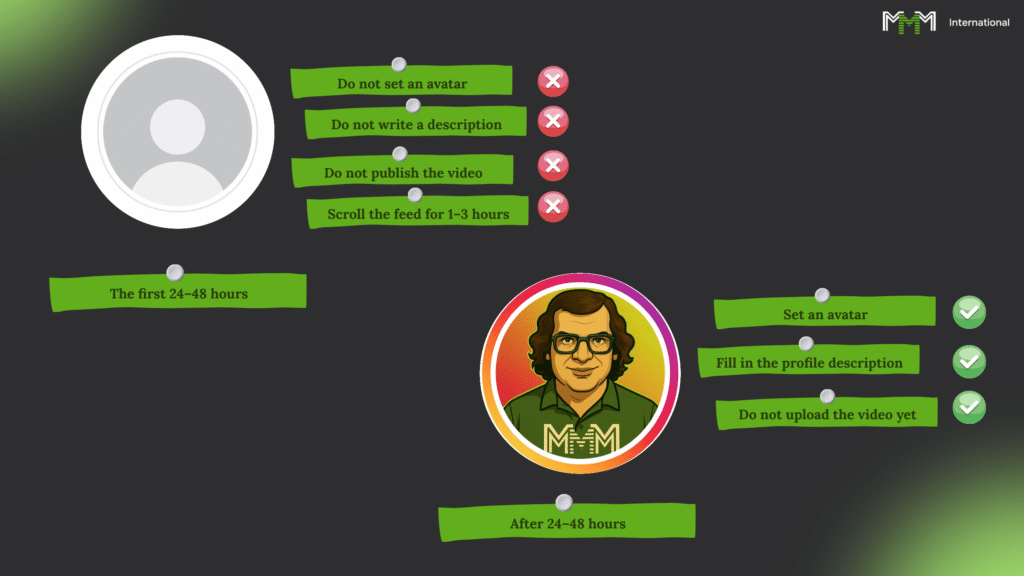
First 24-48 hours:
- No avatars - let the profile lie naked.
- We don't touch the description either.
- We don't do videos.
- You just stroll around the feed for a couple of hours like a regular gawker: liked, scrolled, admired.
After this 24 hours or so:
- Now put up an avatar.
- Fill out the description, but without getting too hot.
- Still don't post the video - let the algorithm get used to your face.
Write a safe description:
No "fast money" or any other nonsense. Write neutrally, like:
"Subscribe, it's going to be interesting here!"
or
"Content Every Day."
That's it. The system will think you're an ordinary mortal, not a dodgy spammer. It'll let you in.
Lesson #4 - Final Account Warm-up
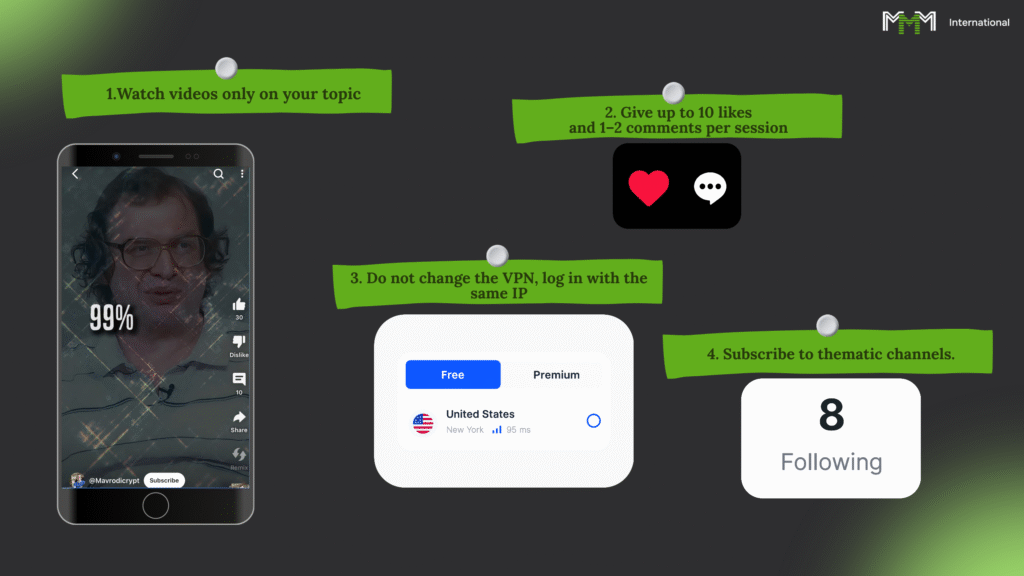
Look, an account is like dough on yeast. If you put it in the oven right away, it'll make bricks. You have to let it rise. It's the same story here: haste kills coverage, and algorithms like to be "alive" and "calm".
Which we do for a couple more days:
- You only look at things related to your topic - memes, finance, crypto, or whatever you plan on pouring yourself.
- You like no more than a dozen videos per visit. You comment on a couple of videos at most.
- You do everything with pauses, like a normal person, not a robot on amphetamines.
- You don't yank the VPN, you don't change the IP - one account, one trail.
- You can subscribe to a couple of channels on the topic - that way the algorithm will know what niche to shove you into.
After 2-3 days of such "warm-up" profile is warmed up. Now you can upload videos and start earning, instead of warming up the ban list with your nickname.
Grade 5 results
Remember a simple thing: in this game, it's not who ran first, it's who went right that wins.
What we've recorded:
- No "pour and run" - a new account takes 2-3 days to warm up, otherwise you'll go straight into the shadows.
- You need to work from a clean device: either a new one or after a complete reset.
- VPN is a must.
- Mail and account - 18+ only, and only Gmail or Outlook for less publicity.
- For the first few days, you live like a regular feed gawker: you look, you leaf through, you don't publish.
- Final warm up - likes, subscriptions, occasional comments, behaviour of a live bot, not a factory bot.
Conclusion: now you know how to prepare an account so that it is not buried by algorithms, but on the contrary, it is pushed forward. The rest is a matter of technique and your chutzpah.
Final push

Well, I got it. I didn't just "look at it and forget it" - I really understood what is a dark forest for others.
You can do it now:
- Making videosthat bring in money for views - even from an empty channel.
- Use neural networks How to free mercenary army: scripts, voiceover, pictures, animation.
- Mount the material from the first frame to the last second right in CapCut.
- Create content for any topic and any audience.
- Prepare accounts so that the algorithms drag you up instead of burying you in the shadows.
Then it's simple: take what you've learnt and start working.
The system is waiting - now it's your turn.